Pages

Thursday, 10 December 2015

SQL VIEW

View
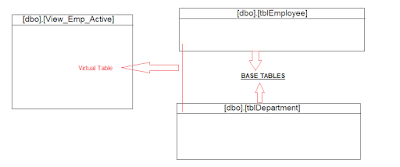
A VIEW in SQL in completely based on the concept of Virtual Table which comes as a result of some SQL query. It behaves like a real table and you can perform all SQL statements and function on a VIEW.


Tech-spoon.com - SQL-VIEW


How to create a VIEW:

Syntax:

CREATE VIEW [dbo].[View_Name] as
select A.Name, A.Email, A.Phone
from tbl_name as A
where A.status = 1

Example:

For example let me create a table as tblEmployee
CREATE TABLE [dbo].[tblEmployee]
(
id int identity(1,1),
Emp_Code varchar(20) primary key,
Emp_Name varchar(500),
Emp_Email nvarchar(500),
Emp_Salary decimal,
Emp_Dept int,
Emp_Status int
)

Now I am going to create another table with the name tblDepartment

CREATE TABLE [dbo].[tblDepartment]
(
id int identity(1,1),
Dept_Id int primary key,
Dept_Name varchar(500),
Dept_Status int
)

Now based on these two tables I want to get details of those employees who are currently working for the organization i.e. has Emp_Status as 1, for this I am going to create a VIEW named as View_Emp_Active.

CREATE VIEW [dbo].[View_Emp_Active] as
select A.Emp_Code, A.Emp_Name, A.Emp_Email, A.Emp_Salary, B.Dept_Name
from tblEmployee A inner join tblDepartment B
on A.Emp_Dept = B.Dept_Id
where a.Emp_Status = 1

So, whenever you need to get the list of active employees just call this View rather than writing the full code of the select statement from two tables using join statement.

Some Important things you should know about the SQL VIEW:
1.    A view can only be updated i.e. insert, delete, update statement can only applied on the View if it is formed from s single table, otherwise you cannot perform these actions on a View.
2.    You cannot have a view having more than 1000+ columns.

For more information about website development please visit http://www.jalwaltechnologies.com.

Friday, 30 October 2015

ASP.NET Dropdown for Months (Filled)

               <asp:DropDownList ID="ddlmonth" runat="server" CssClass="form-control">
                                    <asp:ListItem Text="January" Value="1"></asp:ListItem>
                                    <asp:ListItem Text="February" Value="2"></asp:ListItem>
                                    <asp:ListItem Text="March" Value="3"></asp:ListItem>
                                    <asp:ListItem Text="April" Value="4"></asp:ListItem>
                                    <asp:ListItem Text="May" Value="5"></asp:ListItem>
                                    <asp:ListItem Text="June" Value="6"></asp:ListItem>
                                    <asp:ListItem Text="July" Value="7"></asp:ListItem>
                                    <asp:ListItem Text="August" Value="8"></asp:ListItem>
                                    <asp:ListItem Text="September" Value="9"></asp:ListItem>
                                    <asp:ListItem Text="October" Value="10"></asp:ListItem>
                                    <asp:ListItem Text="November" Value="11"></asp:ListItem>
                                    <asp:ListItem Text="December" Value="12"></asp:ListItem>
               </asp:DropDownList>

Thursday, 8 October 2015

How to make Tab using Bootstrap?

making tab in bootstrap is very simple, it just take a minute to understand this simple code...


<!--Start  tabs -->
<div>
  <ul class="nav nav-tabs" role="tablist">
    <li role="presentation" class="active"><a href="#home" aria-controls="home" role="tab" data-toggle="tab">Home</a></li>
    <li role="presentation"><a href="#profile" aria-controls="profile" role="tab" data-toggle="tab">Profile</a></li>
    <li role="presentation"><a href="#messages" aria-controls="messages" role="tab" data-toggle="tab">Messages</a></li>
    <li role="presentation"><a href="#settings" aria-controls="settings" role="tab" data-toggle="tab">Settings</a></li>
  </ul>

  <!-- Tab panes -->
  <div class="tab-content">
    <div role="tabpanel" class="tab-pane active" id="home">hello babby</div>
    <div role="tabpanel" class="tab-pane" id="profile">...</div>
    <div role="tabpanel" class="tab-pane" id="messages">...</div>
    <div role="tabpanel" class="tab-pane" id="settings">...</div>
  </div>
</div>
<!--End  tabs -->

<script>
$('#myTabs a').click(function (e) {
  e.preventDefault()
  $(this).tab('show')
})

</script>

How to make Popup or Modal using Bootstrap?

try this very simple code to make a popup :

<!-- Start Button trigger modal -->
<button type="button" class="btn btn-primary btn-lg" data-toggle="modal" data-target="#myModal">
  Launch demo modal
</button>

<!-- Modal -->
<div class="modal fade" id="myModal" tabindex="-1" role="dialog" aria-labelledby="myModalLabel">
  <div class="modal-dialog" role="document">
    <div class="modal-content">
      <div class="modal-header">
        <button type="button" class="close" data-dismiss="modal" aria-label="Close"><span aria-hidden="true">&times;</span></button>
        <h4 class="modal-title" id="myModalLabel">Modal title</h4>
      </div>

      <div class="modal-body">
        ...your text or form here…
      </div>

      <div class="modal-footer">
        <button type="button" class="btn btn-default" data-dismiss="modal">Close</button>
        <button type="button" class="btn btn-primary">Save changes</button>
      </div>
    </div>
  </div>
</div>
<!-- End Button trigger modal -->

<script>
$('#myModal').on('shown.bs.modal', function () {
  $('#myInput').focus()
})

</script>

How to make ToolTip using Bootstrap?


The code to create tooltip by using bootstrap is as follows :


<!-- Start ToolTip -->
<div class="container">
  <h3>Tooltip Example</h3>
  <p>Tooltips are not CSS-only plugins, and must therefore be initialized with jQuery: select the specified element and call the tooltip() method.</p>
  <a href="#" data-toggle="tooltip" data-placement="top" title="Hooray!">Hover over me</a>
</div>
<!-- End ToolTip -->

<script>
$(function () {
  $('[data-toggle="tooltip"]').tooltip()
})

</script>

How to make Responsive Navigation using Bootstrap?

Try the code given below to start a navigation design.


<!-- Start Navigation -->
<nav class="navbar navbar-inverse">
  <div class="container-fluid">
    <div class="navbar-header">
      <button type="button" class="navbar-toggle" data-toggle="collapse" data-target="#myNavbar">
        <span class="icon-bar"></span>
        <span class="icon-bar"></span>
        <span class="icon-bar"></span>                       
      </button>
      <a class="navbar-brand" href="#">WebSiteName</a>
    </div>
    <div class="collapse navbar-collapse" id="myNavbar">
      <ul class="nav navbar-nav">
        <li class="active"><a href="#">Home</a></li>
        <li class="dropdown">
          <a class="dropdown-toggle" data-toggle="dropdown" href="#">Page 1 <span class="caret"></span></a>
          <ul class="dropdown-menu">
            <li><a href="#">Page 1-1</a></li>
            <li><a href="#">Page 1-2</a></li>
            <li><a href="#">Page 1-3</a></li>
          </ul>
        </li>
        <li><a href="#">Page 2</a></li>
        <li><a href="#">Page 3</a></li>
      </ul>
      <ul class="nav navbar-nav navbar-right">
        <li><a href="#"><span class="glyphicon glyphicon-user"></span> Sign Up</a></li>
        <li><a href="#"><span class="glyphicon glyphicon-log-in"></span> Login</a></li>
      </ul>
    </div>
  </div>
</nav>

<!-- End Navigation -->

How to make Responsive Design using Bootstrap?

   
Follow these basic steps to get started to bootstrap design.

       1.      Use DOC into head in HTM5 before start the <html> Tag
             <!DOCTYPE html>
2.       Add language into HTMl tag
<html lang="en">

3.       Use Meta information likes:
<meta charset="utf-8">
<meta name="viewport" content="width=device-width, initial-scale=1;maximum-scale=1.0, user-scalable=no"">               

4.       Download or use online CSS from Bootstrap:
<link rel="stylesheet" href="http://maxcdn.bootstrapcdn.com/bootstrap/3.3.5/css/bootstrap.min.css">

5.       Download or use online JS from Bootstrap:
<script src="https://ajax.googleapis.com/ajax/libs/jquery/1.11.3/jquery.min.js"></script>
  <script src="http://maxcdn.bootstrapcdn.com/bootstrap/3.3.5/js/bootstrap.min.js"></script>

6. Download bootstrap from here

Friday, 24 July 2015

Nested Gridview in ASP.NET

Introduction : Nested gridview means gridview within a gridview. this example will show you how we can do this and by clicking on parent gridview's row we will show the child gridview.

Database : For this I am using a employee table and the structure of this employee table is as follows:

CREATE TABLE [dbo].[employee](
       [id] [int] IDENTITY(1,1) NOT NULL,
       [name] [nvarchar](200) NULL,
       [designation] [nvarchar](200) NULL,
       [salary] [float] NULL,
       [manager] [int] NULL
) ON [PRIMARY]


I have inserted some dummy data to this table as - 

Design: I have designed a gridview for this and put another child gridview in parent gridview. The design of this is as below :

<asp:GridView ID="gvdetails" runat="server" Width="100%" AutoGenerateColumns="false"            onmousehover="this.row.select();" OnRowCreated="gridclass_RowCreated"
            onselectedindexchanged="gvdetails_SelectedIndexChanged">
        <Columns>
<asp:BoundField HeaderText="ID" DataField="id" HeaderStyle-Font-Bold="true" />
       <asp:BoundField HeaderText="Name" DataField="name" HeaderStyle-Font-Bold="true" />
<asp:BoundField HeaderText="Designation" DataField="designation" HeaderStyle-Font-                         Bold="true" />
<asp:BoundField HeaderText="Salary" DataField="salary" HeaderStyle-Font-Bold="true" />
       <asp:TemplateField>
          <ItemTemplate>
             <tr>
               <td colspan="12">
<asp:GridView ID="gvChildGrid" runat="server" CssClass="EU_DataTable1" AutoGenerateColumns="false" Width="100%" BackColor="Gray" Visible="false">
                                    <Columns>
                                        <asp:BoundField HeaderText="Jounior Name" DataField="name" HeaderStyle-HorizontalAlign="Center" />
                                    </Columns>
                                </asp:GridView>
                            </td>
                        </tr>
                    </ItemTemplate>
                </asp:TemplateField>
            </Columns>
        </asp:GridView>

Code Behind:
        To bind the parent gridview I have created a function and called it on the Page_Load() event of the page. The function is as follows - 

    public void bindmain()
    {
        SqlDataAdapter da = new SqlDataAdapter("select * from employee", con);
        DataTable dt = new DataTable();
        da.Fill(dt);
        gvdetails.DataSource = dt;
        gvdetails.DataBind();
    }

Now for further action I have executed some events of parent Gridview as follows : 
  1. Row_Created - This will design the row of parent gridview:

  protected void gridclass_RowCreated(object sender, GridViewRowEventArgs e)
    {
        if (e.Row.RowType == DataControlRowType.DataRow)
        {
            e.Row.Attributes["onmouseover"] = "this.style.cursor='pointer';this.style.textDecoration='none'; this.style.background='#61CFB3'";
            e.Row.Attributes["onmouseout"] = "this.style.textDecoration='none'; this.style.background='White'";
            e.Row.ToolTip = "Click to select row";
            e.Row.Attributes["onclick"] = this.Page.ClientScript.GetPostBackClientHyperlink(this.gvdetails, "Select$" + e.Row.RowIndex, true);
        }
    }

2. SelectedIndexChanged Event : This event will be fired when the parent gridview's row is clicked :
    protected void gvdetails_SelectedIndexChanged(object sender, EventArgs e)
    {
        int index = gvdetails.SelectedRow.RowIndex;
        string id = gvdetails.Rows[index].Cells[0].Text.Trim();
        GridView gv = (GridView)gvdetails.Rows[index].FindControl("gvChildGrid");
        if (gv.Visible == true)
        {
            gv.Visible = false;
        }
        else
        {
            SqlDataAdapter da = new SqlDataAdapter("select * from employee where manager = '" + id + "'", con);
            DataTable dt = new DataTable();
            da.Fill(dt);
            gv.DataSource = dt;
            gv.DataBind();
            gv.Visible = true;
        }
    }

Note : Put this on the page decleration part of the webpage : 

EnableEventValidation="false"

Download The Sample Here...

Safe Coding.......

Wednesday, 22 July 2015

How to upload file in ASP.NET

Introduction :
This code will help you understand how to use file upload control in asp.net and the code to upload the file on specific folder path.

Code:

       string iim = DateTime.Now.ToString("ddMMyyyyHHmmss"); //prefis of file name to upload
                if (FileUpload01.HasFile)
                {
                    string f1 = Path.GetFileName(FileUpload01.PostedFile.FileName);
                    string[] xx = f1.Split('.');  // to get posted file extension
                    string a = iim + "_" + xx[1].ToString();
                    FileUpload01.SaveAs(Server.MapPath("~/FolderPath/") + a);
                }

Thursday, 9 July 2015

List Box Control

Introduction :
This code will show how to use ListBox to Select/Filter items :
Design Code :
<div style="width: 100%; float: left;">
            <div style="width: 25%; float: left; margin-top: 10px;">
                <asp:ListBox ID="ListBox1" runat="server" Height="150px" Width="98%" SelectionMode="Multiple">
                    <asp:ListItem>A</asp:ListItem>
                    <asp:ListItem>B</asp:ListItem>
                    <asp:ListItem>C</asp:ListItem>
                    <asp:ListItem>D</asp:ListItem>
                    <asp:ListItem>E</asp:ListItem>
                    <asp:ListItem>F</asp:ListItem>
                </asp:ListBox>
            </div>
            <div style="width: 8%; float: left; margin: 10px;">
                <asp:Button ID="btn01" runat="server" OnClick="btn01_Click" Text=">" Style="margin: 3px 14px;" />
                <asp:Button ID="Button2" runat="server" OnClick="Button1_Click" Text=">>" Style="margin: 3px 14px;" />
                <asp:Button ID="Button3" runat="server" OnClick="Button2_Click" Text="<" Style="margin: 3px 14px;" />
                <asp:Button ID="Button4" runat="server" OnClick="Button3_Click" Text="<<" Style="margin: 3px 14px;" />
            </div>

            <div style="width: 25%; float: left; margin-top: 10px;">
                <asp:ListBox ID="ListBox2" runat="server" Height="150px" Width="98%" SelectionMode="Multiple"></asp:ListBox>
            </div>
            <asp:Label ID="lbltxt" runat="server" ForeColor="Red"></asp:Label>
        </div>


Code Behind : 

ArrayList arraylist1 = new ArrayList();
    ArrayList arraylist2 = new ArrayList();
    protected void btn01_Click(object sender, EventArgs e)
    {
        lbltxt.Visible = false;
        if (ListBox1.SelectedIndex >= 0)
        {
            for (int i = 0; i < ListBox1.Items.Count; i++)
            {
                if (ListBox1.Items[i].Selected)
                {
                    if (!arraylist1.Contains(ListBox1.Items[i]))
                    {
                        arraylist1.Add(ListBox1.Items[i]);
                    }
                }
            }
            for (int i = 0; i < arraylist1.Count; i++)
            {
                if (!ListBox2.Items.Contains(((ListItem)arraylist1[i])))
                {
                    ListBox2.Items.Add(((ListItem)arraylist1[i]));
                }
                ListBox1.Items.Remove(((ListItem)arraylist1[i]));
            }
            ListBox2.SelectedIndex = -1;
        }
        else
        {
            lbltxt.Visible = true;
            lbltxt.Text = "Please select atleast one in Listbox1 to move";
        }
    }
    protected void Button1_Click(object sender, EventArgs e)
    {
        lbltxt.Visible = false;
        while (ListBox1.Items.Count != 0)
        {
            for (int i = 0; i < ListBox1.Items.Count; i++)
            {
                ListBox2.Items.Add(ListBox1.Items[i]);
                ListBox1.Items.Remove(ListBox1.Items[i]);
            }
        }
    }
    protected void Button2_Click(object sender, EventArgs e)
    {
        lbltxt.Visible = false;
        if (ListBox2.SelectedIndex >= 0)
        {
            for (int i = 0; i < ListBox2.Items.Count; i++)
            {
                if (ListBox2.Items[i].Selected)
                {
                    if (!arraylist2.Contains(ListBox2.Items[i]))
                    {
                        arraylist2.Add(ListBox2.Items[i]);
                    }
                }
            }
            for (int i = 0; i < arraylist2.Count; i++)
            {
                if (!ListBox1.Items.Contains(((ListItem)arraylist2[i])))
                {
                    ListBox1.Items.Add(((ListItem)arraylist2[i]));
                }
                ListBox2.Items.Remove(((ListItem)arraylist2[i]));
            }
            ListBox1.SelectedIndex = -1;
        }
        else
        {
            lbltxt.Visible = true;
            lbltxt.Text = "Please select atleast one in Listbox2 to move";
        }
    }
    protected void Button3_Click(object sender, EventArgs e)
    {
        lbltxt.Visible = false;
        while (ListBox2.Items.Count != 0)
        {
            for (int i = 0; i < ListBox2.Items.Count; i++)
            {
                ListBox1.Items.Add(ListBox2.Items[i]);
                ListBox2.Items.Remove(ListBox2.Items[i]);
            }
        }

    }